Saturday, August 2, 2025

Comfort Attendance: Support for Multiple Attendance Statuses

You can configure custom statuses starting with the default Absent and Present. Additional statuses like Picked Up can be added to suit your needs.

Clicking a name will cycle through the statuses and loop back to the beginning. Alternatively, you can open a dropdown list to select a specific status.


You can fully customize the status code, label, color, and icon to fit your needs.

Each status has the following attributes, listed in quotes and separated by commas:

  • Valid code on the sheet

  • Label, color, and icon, which are displayed on the web app page for that status code


The web app will update Google attendance sheet and dashboard accordingly.


Setup instructions and details in Comfort Attendance Setup > Option 2.


Sunday, July 6, 2025

One Link Sign-up: Enhanced Web App Setup Flow

The Set Up Web App function has been enhanced to support both Automatic and Manual deployment options.

Automatic Deployment: Quickly deploy with default settings for a fast and hassle-free setup.

Manual Deployment: For technical users who want full control over deployment configurations.

This enhancement gives you flexibility to choose the method that best fits your needs.


Friday, July 4, 2025

Comfort Attendance: Enhanced the Web App Setup Flow

The Set Up Web App function has been enhanced to support both Automatic and Manual deployment options.

Automatic Deployment: Quickly deploy with default settings for a fast and hassle-free setup.

Manual Deployment: For technical users who want full control over deployment configurations.

This enhancement gives you flexibility to choose the method that best fits your needs.


Tuesday, June 10, 2025

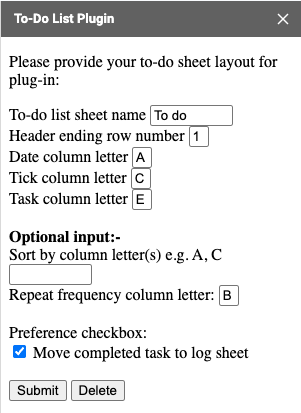
To-do List Plugin: Supports the "Format → Convert to Table" Feature

🆕 To-do List Plugin Now Supports the "Format → Convert to Table" Feature

The plugin now works seamlessly with Google Sheets' "Convert to table" format.

  • You can add a new table row by clicking the ➕ icon.

  • As a result, an extra blank row is no longer required.

  • If you prefer not to have a blank row automatically inserted, simply uncheck "Insert task when blank is filled" in the configuration sidebar below.


Friday, June 6, 2025

To-do List Plugin: Template with Calendar View

Getting Started

  1. Get the Template if you haven't done it
    Download a copy from:
    👉 https://ko-fi.com/s/221bf4dca6

  2. Install the To-do List Plugin
    From the Google Workspace Marketplace:
    👉 https://workspace.google.com/marketplace/app/todo_list_plugin/1001006504533

  3. Set Up Your Copy

    • Open your copied spreadsheet and move to where you like

    • Rename it as you like.

    • Go to File > Settings and update the Locale to match your region.

    • Go to Extensions > To-do List Plugin > Plug in to initialize.

📩 Need Help?
Feel free to contact us at spcsoft.solutions@gmail.com for any questions.


Sunday, May 11, 2025

To-do List Plugin: New User Preferences

Configuration has been enhanced to support user preferences.


If "Move completed task to log sheet" is checked, completed tasks will automatically be transferred to the log sheet.


Thursday, May 1, 2025

One Link Sign-up: Potluck Sign-up Customization Steps

One Link Sign-up web application retrieves data based on column letters defined in the configuration. Therefore, all column header names can be customized. Please follow the steps below to set up the potluck sign-up web app:

1. Update Your Sheet Name

    The sheet name (e.g., Potluck Sign-up Example) will be shown in:


    and all page titles within the web app

2. Define Sign-Up (Sign-up Tab)

    Use the Sign-up tab to specify the potluck sign-ups.


    Required Columns:
  • Date: Date and time of the potluck (multiple potlucks can be created)

  • Dish: Name of disk

  • Sign-up: This field is automatically updated by the web app when people sign up

  • I will bring: This is a customizable column—delete or add to collect additional information during sign up. All columns will be shown in the sign-up page.         

 3. Define Potluck Dish Details (Item Tab)

    Use the Item tab to provide the potluck dish details.    

    
      Required Columns:
  • Item: Must match the Dish name in the Sign-up tab in order to provide the details to sign-up.

  • Needed: Number of the dishes needed. If blank, only one will be displayed for sign up.

  • Contact ID: Email address of the potluck host. Host view via the “Set up web app” function will ensure the sign-on user which has Email address defined in this column can access.

  • Input (optional): Specify what fields are displayed for people to input during sign up. This column must be defined in the configuration. If no input field, the input column in configuration must be blank.

  • Contact: Name of the potluck host

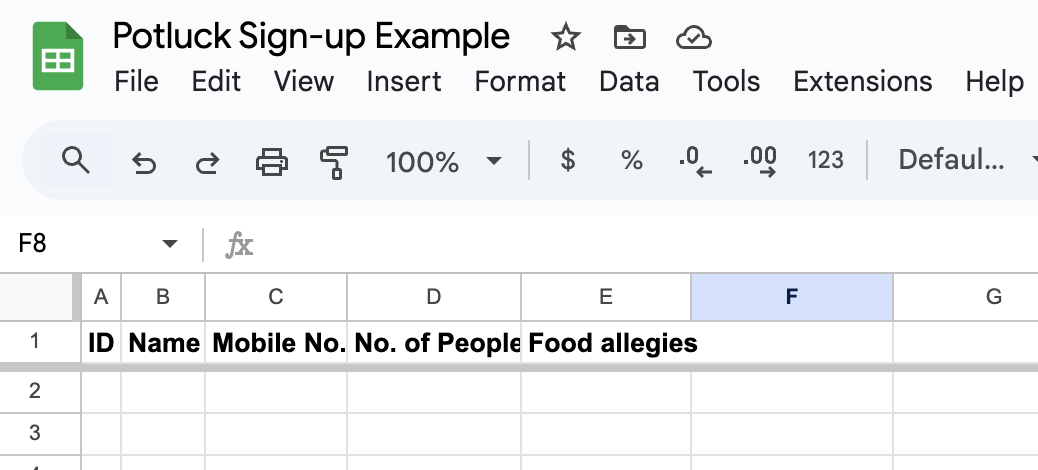
4. Set Up Signer Information (Signer Tab)

    Update the Signer tab to define the information required from people signing up.


   Required Columns:
  • ID: Email address of the signer (used to access the web app)

  • Name: Name of the signer (entered during sign-up)

  • Mobile No.: This is a customizable field—add or rename fields to collect additional information. All columns will be shown in the sign-up page.


5. Configure the Web App

Go to Extensions > One Link Sign-up > Configure web app to set up and customize the web app configuration.


    Field Definitions:

  • Sheet names: Names of the sheets (tabs) in your sign-up spreadsheet

  • Columns: Column letters corresponding to data fields in the Sign-up, Item and Signer tabs

  • Delimiter in view definition: Delimiter used to separate column headers in different views and the optional input sign-up fields (e.g., ;)

  • Host view: Columns displayed in the host view (e.g., Date;Item;Name;I will bring;ID;Mobile No.;Contact)        


  • Sign-up view: Columns shown to users when signing up (e.g., Date;Item;Name;I will bring;Food allegies;Contact)