Thursday, May 8, 2025

One Link Sign-up Event Customization

One Link Sign-up web application retrieves data based on column letters defined in the configuration. Therefore, all column header names can be customized. Please follow the steps below to set up the event sign-up web app:

1. Update Your Sheet Name


    The sheet name (e.g., Event Sign-up Example) will be shown in:
    and all page titles within the web app

2. Define Sign-Ups (Sign-up Tab)

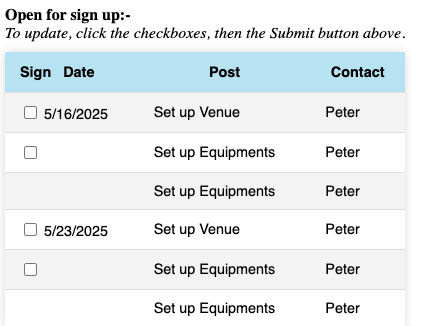
    Use the Sign-up tab to specify when and how often each post is available.


    Required Columns:

  • Date: Date and time the post is available (multiple entries can be created for the same post)

  • Post: Name of the post. Details will be defined in the Post tab.

  • Sign-up: This field is automatically updated by the web app when users sign up

3. Define Available Posts (Post Tab)

    Use the Post tab to list the roles or tasks details.    


      Required Columns:
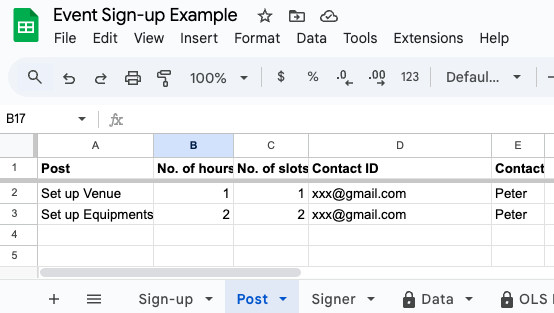
  • Post: The name of the post (must match the name used in the Sign-up tab)

  • No. of hours: Duration of the post. Default is 1 hour

  • No. of slots: Number of available sign-up slots for the post

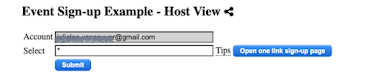
  • Contact ID: Email address of the post host. This is used to access the host view via the “Set up web app” function

  • Contact: Name of the post host

4. Set Up Signer Information (Signer Tab)

    Update the Signer tab to define the information required from individuals signing up.


   Required Columns:
  • ID: Email address of the signer (used to access the web app)

  • Name: Name of the signer (entered during sign-up)

  • Mobile No.: This is a customizable field—add or rename fields to collect additional information. All columns will be shown in the sign-up page.


5. Configure the Web App

    Go to Extensions > One Link Sign-up > Configure web app to set up and customize the web app configuration.


    Field Definitions:

  • Sheet names: Names of the sheets (tabs) in your sign-up spreadsheet

  • Columns: Column letters corresponding to data fields in the Post, Sign-up, and Signer tabs

  • Delimiter in view definition: Delimiter used to separate column headers in different views (e.g., ;)

  • Host view: Columns displayed in the host view (e.g., Date;Post;Name;ID;Mobile No.;Contact)

        
  • Sign-up view: Columns shown to users when signing up (e.g., Date;Post;Contact)
        

  • One Link Sign-up allows host to select posts when generating the sign-up page for each team. 
        
  • Team view defines columns visible to teams (e.g., Date;Post;Name;Contact)
        
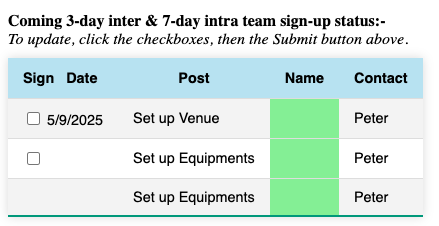
  • x day intra: Shows sign-ups within the team for the next x days

  • x day inter: Displays cross-team sign-ups for coordination in the next x days


Tuesday, May 6, 2025

One Link Sign-up Sign-in from Any Email Address

People without Google accounts can now access the One Link Sign-up.

For new installations, the native script authorization will include the "Send mail as you" permission. If this permission is granted, users will see a sign-in page below in the web app where they can enter their email address to receive a password-free access link.


If the host does not authorize the "Send mail as you" permission during web app setup, users will not see the password-free sign-in option.

If the host wants to enable this feature and allow email access, they can follow the steps below to grant the necessary permission:

1. Open the user sheet, go to Extension > Apps Scipt.

2. Go to Deploy > Manage deployments

3. Click the edit icon which will enable the deploy button below:

4. Click the Deploy button.
5. Click the Authorize access button
6. As in previous web app authorization, go through the steps from Choose an account > Advanced > Go to {your sheet name} (unsafe) > Continue > Allow.

7. Click the Done button and close the Apps Script page. People can now enter their email address to receive a password-free access link.


Thursday, April 3, 2025

One Link Sign-up reaches 2,000+ installs

Congratulations to those who have completed all the set-up steps.


There are 2.94K of visits on the One Link Sign-up web app set-up page.


Creating a Google web app on a user's Google sheet is a technical task. For general users, we automated the steps as far as possible but it still requires quite a number of user authorization steps. To assist those who are not technical savvy, we’ve provided a YouTube video and step-by-step guide. Please feel free to follow either one. 

For those who completed the web app, they can create multiple posts within a single sheet. Our sign-up web app allows user to filter posts to a web page which can be sent to a group of recipients. Recipients only need one link to sign up posts which are relevant to them and maintain their sign-ups online.
While the setup may take some time, having all sign-up data in user sheet enables powerful reporting and analysis through pivot tables and other built-in Google tools.


Wednesday, April 2, 2025

One Link Sign-up and Comfort Attendance exception "A sheet with the name "xxx" already exists. Please enter another name."

Thank you to Lisa who contacted developer on the exception. 

From Google execution log, the setup function submitted the createTemplateForm twice. The exception came from the 2nd submission.


Both add-ons have been updated to ignore the 2nd submission.


Saturday, March 15, 2025

SPCsoft Galaxy Web App Script Authorization


✅ Why We Use Owner Deployment for Our Google Web Apps

Our web app is designed to be deployed by each user under their own Google account, rather than running centrally from our account. This approach avoids exceeding Google quota limits and offers key benefits in terms of privacy, trust, and ease of use.

⚠️ About the “Unverified App” Warning

When deployed under user's account, Google shows message during script authorization saying:

This app isn’t verified”

This happens because the script is created under your own Google accountgiving you full ownership and control. Since it’s not published on the Google Marketplace under your name, Google flags it as unverified.


✅ Why It’s Safe

  • You own the script – It was created in your Google account and only runs with your permission.

  • It only accesses your sheet – No data leaves your account, and no one else can access it.

  • It’s part of trusted add-on – The add-on you installed is verified by Google and automates this setup to help you host your own web app.


✔️ How to Proceed

  1. On the warning page, click Advanced”

  2. Click Go to [your script name] (unsafe)”

  3. Select permissions ("send email as you" is optional)

  4. Click Allow to grant permissions. 

Once you do this, your personal web app will be fully set up and ready to accept sign-ups or check-ins via your link.


🔒 You Stay in Control

  • You can view, edit, or remove the script any time in your Apps Script dashboard.

  • The script only runs under your authority.


Thursday, March 13, 2025

One Link Sign-up and Comfort Attendance Google Sign In Purpose

The web app sign-in page has been updated below to clarify the purpose and scope of access:

Why Sign In?

Signing in with your Google account allows the web app owner to know who’s using it. Google controls the access and won’t share your Gmail, Drive, or other app data with this web app. Your data stays private and secure.

Friday, February 7, 2025

Pivot Expense Split template for personal income and expenses

Pivot Expense Split can now support personal income and expenses. Please find the template in the setup page

This template has the following features:

1. Input tab supports multiple entries. After entering the transaction, ticking the checkbox will submit. 

    If column G (frequency) is not empty, only the amount will be cleared.

    Please note that checkbox is reserved for submitting the transaction entry. 

2. User can define the account, category and currency in tables for the transaction input:


3. On the Splits tab, user can add additional columns at the end using ARRAYFORMULA on the first row for the whole column.


If ARRAYFORMULA is not allowed, such formula containing AND or OR, user can define the formula in from first row to last reserved row in the column.