Comfort Attendance now supports a Central Web App alongside the User Web App, making setup faster and dramatically reducing deployment effort for casual users.


Comfort Attendance now supports a Central Web App alongside the User Web App, making setup faster and dramatically reducing deployment effort for casual users.
To demonstrate the extensibility of One Link Sign-up on Google Sheets, a new template has been created featuring a dashboard and Google Calendar integration. Additional integrations can be implemented as your requirements evolve.
A. Dashboard
It comes with a ready-to-use dashboard that you can expand at any time as your needs grow.

Ready-to-use calendar scripts are built directly into your sheet, giving you a solid foundation you can easily extend — no extra permissions needed during the add-on installation!
What’s included in the scripts:
onSignUp (e): Automatically updates the online sign-ups to a calendar which you can share with others.
Sync with calendar through the “1L Sign-up” custom menu: you can tabulate and filter sign-ups and sync to a shared Google calendar.
Why it’s great on the injected scripts to your sheet:
Transparent — You sees in the scripts exactly how your calendar permission below will be used.
Flexible — You can customize or extend the scripts.
Powerful — You can add features like email alerts or custom menu actions further.

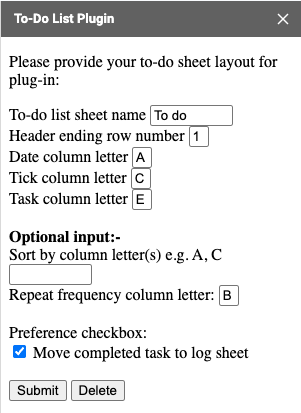
A new Smart To-Do List Plugin template is now available — it includes a user controlled smart refresh drop-down and a calendar view to help you control refresh and visualize your tasks!


🛒 Get the template here: 👉 https://ko-fi.com/s/5d3873c5de
Your purchase directly supports my work and helps me keep developing more features for you.
Starting in August 2022, I finally have had some personal free time to follow my heart. I use my technical knowledge to create and publish simple Google Sheets add-ons that support the people and communities around me.
I never imagined they would grow this much, but over time they’ve reached far more people and communities than I expected. I’m deeply grateful to everyone who has supported my vision. Your feedback and encouragement continue to inspire me to keep improving and creating.
Among them, the To-do List Plugin, One Link Sign-up and Comfort Attendance have become the most popular, with around 7K+, 2K+ and 1K+ downloads so far. It’s been amazing to see how something that started as a personal vision could help so many others. Thank you to users who spare the time that they have saved from using my add-ons to give back their encouraging reviews on the Googe Marketplace.


And most importantly, thank you to my nine supporters on Ko-fi who helped me reach 1% of my goal to keep Serving People and Communities moving forward. Every bit of financial support means a lot and keeps me motivated to continue building and sharing more tools that make everyday tasks a little easier.

The To-do List plugin uses the onEdit trigger to refresh your to-do list. This trigger takes a few seconds to reach Google’s server before the refresh starts. During this short delay, you can continue making multiple updates to your tasks. However, you’ll need to wait for the refresh to complete before making further edits. It is not user friendly for bulk updates, you have to unplug and plug in which is also not convenient.
Because data transmission depends on Google Sheets’ network speed, there is currently no way to improve this delay. Therefore, a new Smart Refresh mode has been developed and is undergoing a pilot testing.
A new refresh control dropdown has been added at the top of the task header which works for desktop browser and mobile app.

Informs the server to refresh.
Automatically refreshes whenever an edit is received from the server.
When an edit occurs, the task header will show:
Desktop: Refresh when idle for 20s. Select this cell to refresh now.
Mobile: Refresh when idle for 20s. Use the above dropdown to refresh now.
After 20 seconds of inactivity (idle):
Desktop: Idle detected – refresh in 10s! Select this cell to refresh or any cell to skip.
Mobile: Idle detected – refresh in 10s!
After 10 more seconds (30s total idle), the server will automatically start refreshing.
The server will not refresh automatically — only when 🎬 Refresh now is selected.
B. Flexible to-do list location
You can now put your to-do list anywhere with other information that you are working on.

Google Sheets mobile + offline mode + installable onEdit triggers is a known and tricky behavior. Here’s a breakdown of why offline to online sometimes get two triggers and sometimes none:
🔍 1. Why it happens
a. Offline edits don’t fire any triggers immediately
When offline, the app records the edits locally; installable triggers (like onEdit(e)) only run on the server.
So while offline → no trigger.
b. When reconnecting
When the mobile app resyncs:
This depends on:
🧪 2. Observed patterns (tested behavior)
Scenario Offline duration Action Result
Short offline (few seconds) Small edit (1 cell) Usually 1 onEdit
Long offline (many edits) Multiple cells Often no trigger or 2+ triggers
Reopen sheet after being Edits in different areas Sometimes fires all at once or none
🕒 3. When sync happens automatically
Offline edits made on the mobile app are synced when all of the following conditions are true:
1. Internet connection restored
⚙️5. Pivot Expense Split Enhancement
Use an onChange(e) installable trigger which fires when the structure or content of the sheet changes, even after sync. It will trigger once per batch sync instead of per cell. The following is scripted to post offline input at reconnection.
function onChange(e) {
if (e.changeType === 'EDIT') {
// handle sync edits here
}
}
⚠️ It doesn’t give e.range like onEdit — only that something changed.
Previously, Pivot Expense Split relied on a simple Google onEdit trigger, which only runs for up to 30 seconds. That wasn’t enough to handle offline input when device came back online.

The use of installable trigger requires new permission which has been reviewed and approved by Google today. When you run the add-on, Google will prompt you the new permission for your authorization.
Inside the TDL log, Google’s history records the date when a task was logged. For users who want to analyze trends, it is more useful to store this date in its own column. Therefore, the date when the user checks the box to mark a task as done is now added to the log.
Please update your TDL log header as follows:

Date – the original task date
Repeat On – the updated task date based on the frequency code
Completion – the date when the user checked the box to mark the task as done
You can configure custom statuses starting with the default Absent and Present. Additional statuses like Picked Up can be added to suit your needs.
Clicking a name will cycle through the statuses and loop back to the beginning. Alternatively, you can open a dropdown list to select a specific status.

Each status has the following attributes, listed in quotes and separated by commas:
Valid code on the sheet
Label, color, and icon, which are displayed on the web app page for that status code


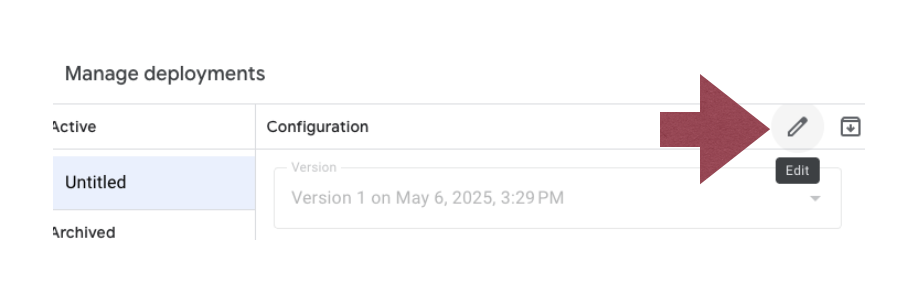
The Set Up Web App function has been enhanced to support both Automatic and Manual deployment options.
Automatic Deployment: Quickly deploy with default settings for a fast and hassle-free setup.
Manual Deployment: For technical users who want full control over deployment configurations.
This enhancement gives you flexibility to choose the method that best fits your needs.

🆕 To-do List Plugin Now Supports the "Format → Convert to Table" Feature
The plugin now works seamlessly with Google Sheets' "Convert to table" format.
You can add a new table row by clicking the ➕ icon.
As a result, an extra blank row is no longer required.
If you prefer not to have a blank row automatically inserted, simply uncheck "Insert task when blank is filled" in the configuration sidebar below.
A new To-Do List Plugin template is now available — it includes a calendar view to help you visualize your tasks!

You can easily see which tasks are completed and which ones are upcoming in the next few days.
🛒 Get the template here: 👉 https://ko-fi.com/s/221bf4dca6
Your purchase directly supports my work and helps me keep developing more features for you.
Configuration has been enhanced to support user preferences.
One Link Sign-up web application retrieves data based on column letters defined in the configuration. Therefore, all column header names can be customized. Please follow the steps below to set up the potluck sign-up web app:
1. Update Your Sheet Name

Use the Sign-up tab to specify the potluck sign-ups.

Date: Date and time of the potluck (multiple potlucks can be created)
Dish: Name of disk
Sign-up: This field is automatically updated by the web app when people sign up
I will bring: This is a customizable column—delete or add to collect additional information during sign up. All columns will be shown in the sign-up page.
3. Define Potluck Dish Details (Item Tab)
Use the Item tab to provide the potluck dish details.

Item: Must match the Dish name in the Sign-up tab in order to provide the details to sign-up.
Needed: Number of the dishes needed. If blank, only one will be displayed for sign up.
Contact ID: Email address of the potluck host. Host view via the “Set up web app” function will ensure the sign-on user which has Email address defined in this column can access.
Input (optional): Specify what fields are displayed for people to input during sign up. This column must be defined in the configuration. If no input field, the input column in configuration must be blank.
Contact: Name of the potluck host
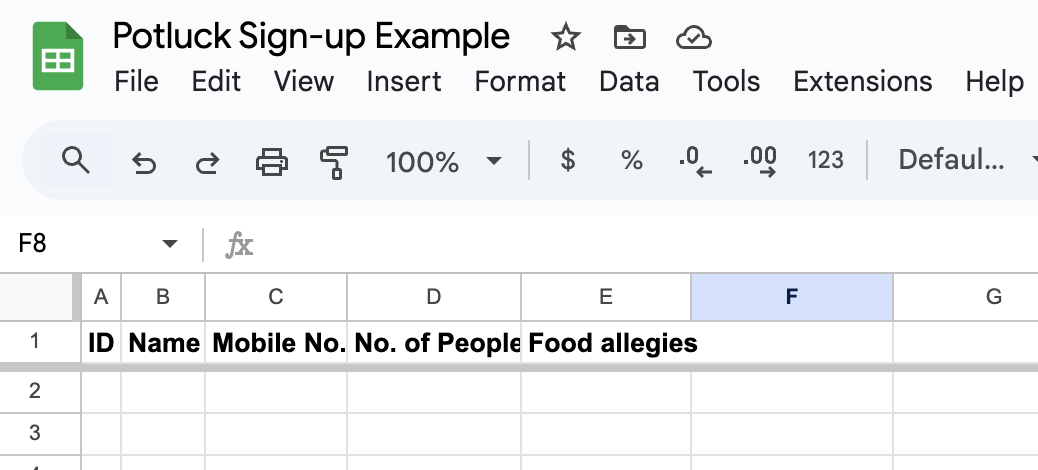
ID: Email address of the signer (used to access the web app)
Name: Name of the signer (entered during sign-up)
Mobile No.: This is a customizable field—add or rename fields to collect additional information. All columns will be shown in the sign-up page.

Field Definitions:
Sheet names: Names of the sheets (tabs) in your sign-up spreadsheet
Columns: Column letters corresponding to data fields in the Sign-up, Item and Signer tabs
Delimiter in view definition: Delimiter used to separate column headers in different views and the optional input sign-up fields (e.g., ;)
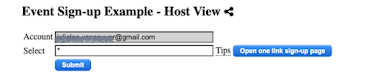
Host view: Columns displayed in the host view (e.g., Date;Item;Name;I will bring;ID;Mobile No.;Contact)
Date;Item;Name;I will bring;Food allegies;Contact)One Link Sign-up web application retrieves data based on column letters defined in the configuration. Therefore, all column header names can be customized. Please follow the steps below to set up the event sign-up web app:
1. Update Your Sheet Name

2. Define Sign-Ups (Sign-up Tab)
Use the Sign-up tab to specify when and how often each post is available.

Required Columns:
Date: Date and time the post is available (multiple entries can be created for the same post)
Post: Name of the post. Details will be defined in the Post tab.
Sign-up: This field is automatically updated by the web app when users sign up
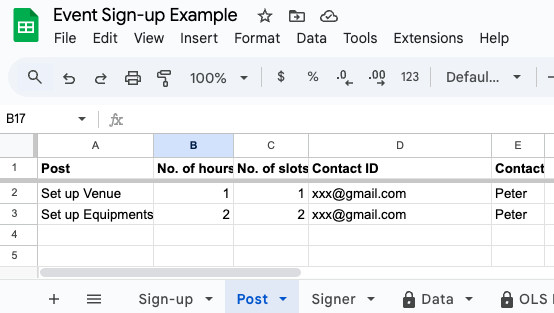
3. Define Available Posts (Post Tab)
Use the Post tab to list the roles or tasks details.
Post: The name of the post (must match the name used in the Sign-up tab)
No. of hours: Duration of the post. Default is 1 hour
No. of slots: Number of available sign-up slots for the post
Contact ID: Email address of the post host. This is used to access the host view via the “Set up web app” function
Contact: Name of the post host

ID: Email address of the signer (used to access the web app)
Name: Name of the signer (entered during sign-up)
Mobile No.: This is a customizable field—add or rename fields to collect additional information. All columns will be shown in the sign-up page.


Field Definitions:
Sheet names: Names of the sheets (tabs) in your sign-up spreadsheet
Columns: Column letters corresponding to data fields in the Post, Sign-up, and Signer tabs
Delimiter in view definition: Delimiter used to separate column headers in different views (e.g., ;)
Host view: Columns displayed in the host view (e.g., Date;Post;Name;ID;Mobile No.;Contact)

Date;Post;Contact)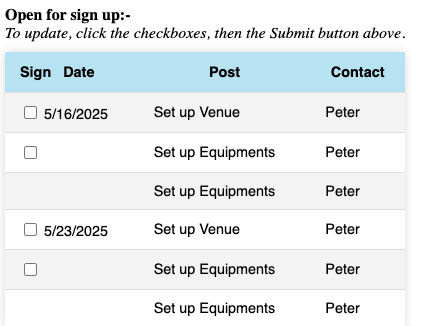

Date;Post;Name;Contact)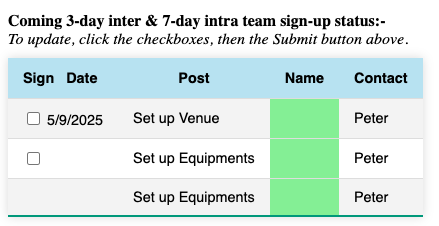
x day intra: Shows sign-ups within the team for the next x days
x day inter: Displays cross-team sign-ups for coordination in the next x days
People without Google accounts can now access the One Link Sign-up.
For new installations, the native script authorization will include the "Send mail as you" permission. If this permission is granted, users will see a sign-in page below in the web app where they can enter their email address to receive a password-free access link.